 A client from San Jose recently visited California Car Sounds and Tint to inquire about a subwoofer enclosure solution for his 2017 Dodge Charger. The client had a pair of Rockford Fosgate Punch P3S shallow-mount subwoofers in a conventional subwoofer enclosure in the back of his car. He recently found out that his family would be expecting a baby, and the new stroller they just picked up wouldn’t fit in the vehicle. The client wanted to keep the subwoofers and find a way to make the stroller fit. After taking a look at the cargo area, we came up with a plan to build a custom fiberglass and Stack Fab subwoofer enclosure under the floor of the trunk.
Dodge Charger Subwoofer Solution
After removing the existing enclosure and floor trim panel, we pulled out the Styrofoam organizer out of what would normally be referred to as the spare tire well. The 2017 Dodge Charger doesn’t include a spare. Instead, Dodge supplies a can of Fix-a-Flat and a 12V air compressor. Our plan was to create a custom enclosure in the space beside the battery and compressor for the client’s Rockford Fosgate subwoofers.
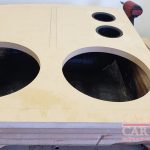
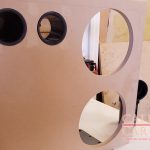
Our fabrication team started by making a template for of the space available before transferring it to a wood pattern. Once we were happy with the shape, we cut six more pieces of ¾-inch MDF and traced the template onto each piece. We rough-cut each piece of wood then bonded the master template to each piece so that we could copy the edges perfectly using a flush-trim bit in our router lift.
The series of seven wooden rings serves as the walls of the enclosure. We use this Stack Fab method instead of pieces of wood mounted vertically because it lets us follow the complex contour of the trunk with impressive accuracy. Once we had the seven layers cut, we glued them together and set to work modifying the back edge to fit the floor.
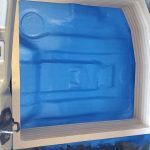
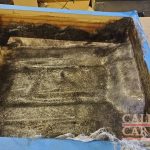
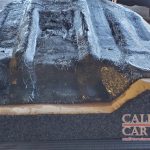
The next step was to apply fiberglass to the bottom of the enclosure to seal the walls to the floor. We used chopped-strand mat fiberglass and soaked it in resin. Our team worked the mat into the contours of the floor and up the sides of the wood frame. Once cured, we removed the enclosure and cut away the rough edges. As you can see, we used high-quality 3M blue painter’s masking tape to ensure the fiberglass would release from the vehicle easily.
Bass-Reflex Subwoofer Enclosure
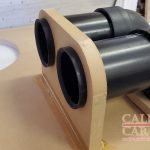
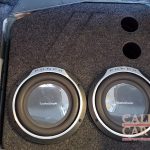
To optimize the efficiency and physical power handling of the subwoofers, we opted for a bass-reflex enclosure design that uses a pair of 3-inch vents. Our team used ABS piping and a pair of 90-degree elbows to create the vents. An MDF support holds the bottom of the vents in place. We applied a small radius to both ends of the vents using a ¼-inch radius bit on our router to ensure smooth airflow in and out of the enclosure.
The top panel was cut using the same method as the rings, but we left the center intact. We added a pair of accent pieces to mimic the Dodge Hash Marks logo before installing the top piece and wrapping the enclosure in a gray trunk-liner carpet.
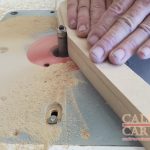
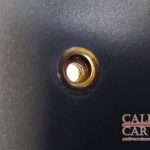
To ensure that the enclosure would be securely attached to the vehicle, our team added threaded inserts to the floor of the Charger. The enclosure bolts into the place so that it won’t move, even in the event of a catastrophic roll-over accident. We never use sheet metal screws to mount equipment as they can weaken over time and pull through the metal.
San Jose’s Custom Car Audio Specialists
With the new subwoofer solution constructed and installed, we double-checked the settings on the amp to ensure that the output of the new enclosure blends perfectly with the rest of the speakers in the system.
The client was thrilled with the design and performance of the new subwoofer enclosure. He can now load his new baby stroller and still have amazing tunes when it drives. If you are looking for a custom subwoofer solution like the one we built for this Charger, drop by California Car Sounds and Tint in Campbell or send us an e-mail using our contact form.
Here has incredible post for “”. Author share a superb ideas include all think that should be very helpful for everyone. Keeps all about very straightforward. Thanks for posting.